
If you haven’t read my other debugging post about visualizing software, I advice you to start there. You should now have a proper understanding of what software is and how to visualize it. Also the term bugs is completely clear.
Developers spend up to 50% of their time debugging according to research by Cambridge university. But education typically lacks training on the subject (McCauley 2008).
In this blog post I want to give you a useful collection of abstract ways to think about debugging. If you write code for a living you probably recognize most (or all) of the techniques, but as starter this can help you structuring your debugging efforts.
Disclaimer
- There is no golden gun/silver bullet which solves all problems!
- This post is about strategies, not techniques (printf’s, gdb, etc…)
- This post uses a high amount of over-simplification, if you’ve studied CS, don’t shoot me.
- This post aims at people starting as a developer
Understand, Find, Fix
We now have the groundwork laid out and can start to think about how to debug. A lot of sources and books about debugging and problem solving all identify a process somewhere between 4-9 steps, see list below:
When we take a look at all these approaches they consist of 3 main phases:
- Understand
- Find
- Fix
Debugging is like removing a needle from a haystack. First you try to understand what the needle and the haystack are. Once you know what needle you’re looking for, you try to find the needle in the haystack. Finally you try to remove the needle from the haystack and fix the problem.
The best learning is done by example, so we can reuse the example of the previous post.
It is a buggy find_max implementation.
As mentioned in that post, as developer you will probably start screaming, what kind of idiot created this example?!
So look for the bug in your typical quick way and, after that continue reading.
Then we have that over with.
1
2
3
4
5
6
7
8
9
10
11
12
13
14
def find_max(num1, num2, num3):
''' Returns the highest of the three numbers '''
max_num = 0
if (num1 > num2) and (num1 > num3):
max_num = num1
if (num2 > num1) and (num2 > num3):
max_num = num1
if (num3 > num1) and (num3 > num2):
max_num = num3
return max_num
print(find_max(3, 5, 1))
Understand
The first step of the process is to understand the problem (needle) and the system (haystack). You should start with collecting your first clues and checking the obvious. Your goal of the understanding phase is to have a clear problem description and a consistent reproduction procedure. You should be able to draw a basic diagram as described in earlier debugging posts that describes the Given, When and Then. To reach this goal we will start with checking the obvious.
Checking the obvious
On a cold winter morning, you walk to your car to go to work. You turn the key of the ignition, but all you hear is the motor cranking, but not starting. What is the first thing you do? You check the fuel-level.
Always start with checking the most obvious possible defects. Don’t take too long checking the obvious, and try to time box it within 10 minutes. Is the program you’re running the one you expect? Are you looking at the haystack you expect? You can’t imagine the amount of problems that are actually solved by noticing you’re running the wrong program. The big benefit of starting with this (apart from solving it directly :)), you’re collecting clues to understand the failure & system. See each clue as a constraint, describing the defect/infection/failure involved. If we think about the visualization programs we are asserting our assumptions about the first state also known as the Given.

Checking the obvious is answering the following questions:
- Is it plugged in?
- Am I doing what I expect I’m doing?
- Are my assumptions about the first state correct?
In our example we should assert that we are running the find_max script we are expecting.
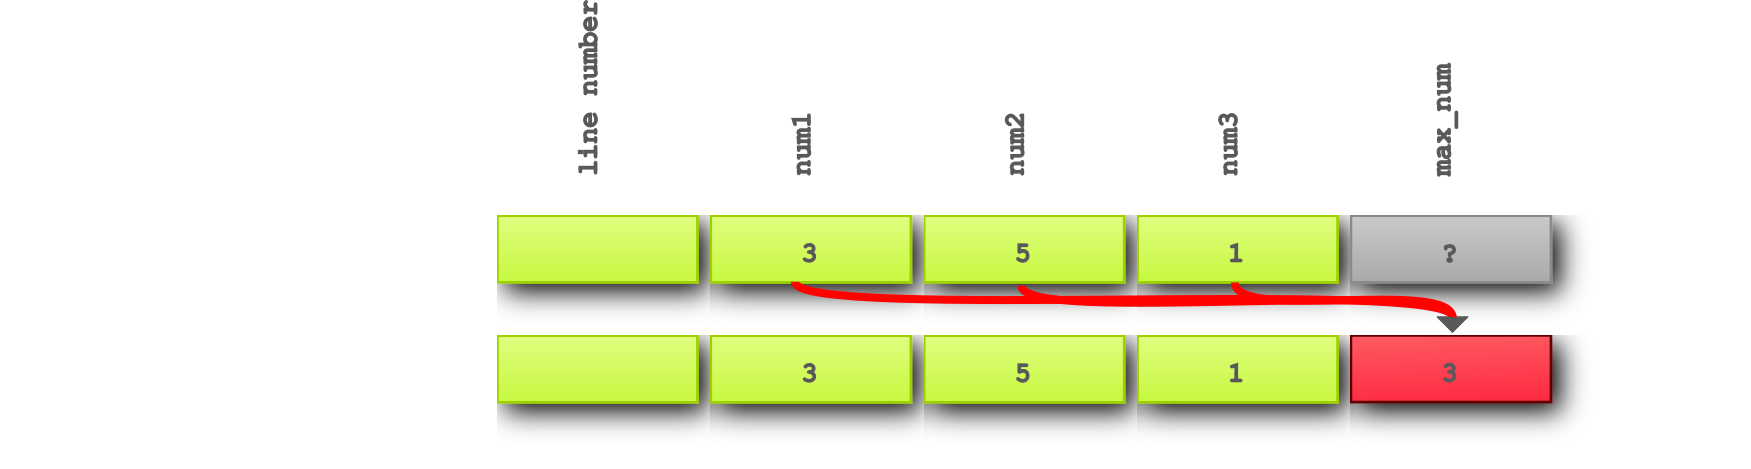
We should also double check that the maximum of 3, 5, 1 should be 5.
Describe the problem
Your mother yells up the stairs: “Something is wrong with the computer?!. It doesn’t do what I expect.” What is the first question that comes to mind?
We’ve checked the obvious and found nothing. Let’s move on to the next step. Before you ever can declare anything fixed, you should be able to reproduce the failure. But if you want to reproduce it, you must know what it is, describe the failure.
You should be able to answer the following 2 questions:
- What did I expect or want to happen?
- What did happen?
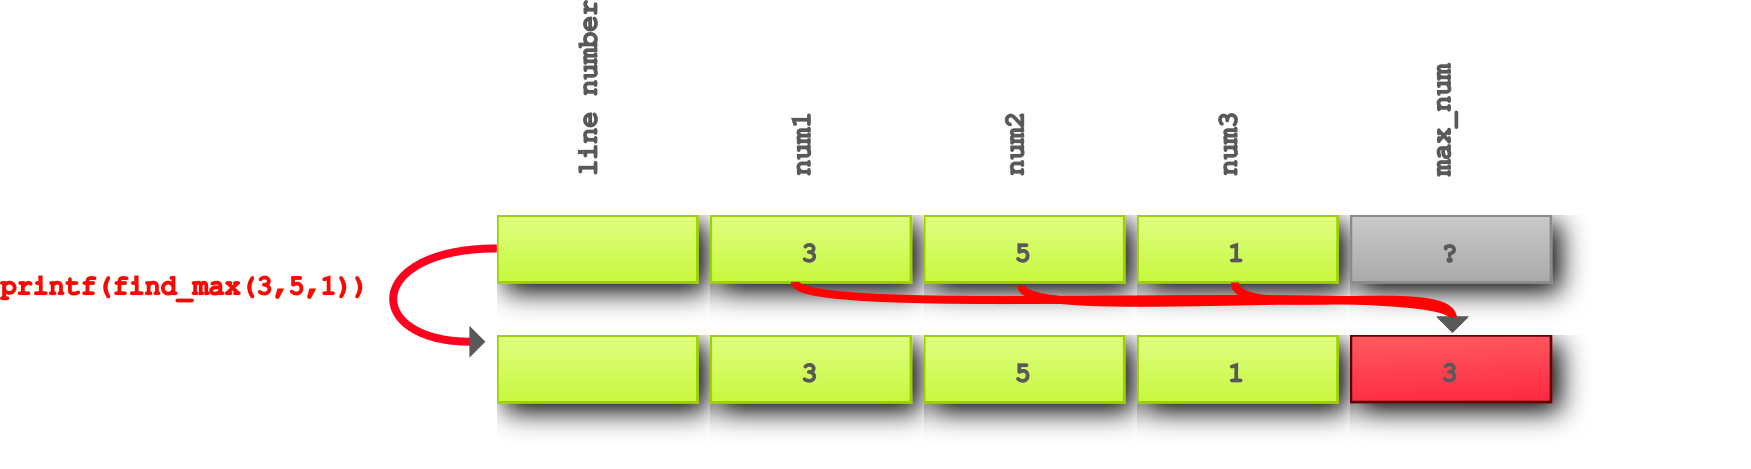
In our example we expect find_max to return 5, but actually it returns 3.
If we think about the visualization programs we are describing the final state that we expect and that it actually is, also known as the Then.
Reproduce the failure
Someday you get a message telling you; “Thanks for your program, but when I open a file, the program crashes”. As a developer you will probably ask, what file did you try to open, and describe me the buttons you’ve pressed.
A reproduction procedure describes the steps needed to show the failure. Trying to reproduce, gives you more clues/constraints. Write down (better yet automate) a procedure how to reproduce the failure. The procedure should be fool-proof, you should absolutely no room for ambiguity. And what is better suited for any fool than running a simple script?
- What steps do I have to do to reproduce the failure?
Reproducing the failure in our example is easy, just run the script!
If we think about the visualization programs we are asserting our assumptions about the steps to go from the first state to the final state. In the Given, When, then idiom this would represent the When, since we already know the Given and Then from our previous steps.
We can now formulate it more formally with the information we have up until now:
Given the numbers
3,5and1, when callingprint(find_max()), then3is printed, but expected5to be printed.
Start keeping notes
This part seems to be the hardest part for developers. Typically a debugging session start out with small checks and as time goes by you keep tumbling down the rabbit hole. After a while you realize you are 2 days further in time, have tried a lot of things, but the failure is still there.
After checking the obvious (<10 min), keep notes during all steps! Keeping notes makes it easy to stop and continue the next day. It also helps in communicating your findings and effort with your colleagues, your team lead, or even to your future self. Sometimes re-reading some notes of the previous day, provides you with the jolt of insight you need to solve your problem.
You should choose your own format & medium, but a simple hand drawn 2-column table can suffice:
| What | Description |
|---|---|
| Problem | Given the numbers 3,5 and 1, when calling print(find_max()), then 3 is printed, but expected 5 to be printed. |
Find
We now know (and understand) the first and final state of our software. We also know what we must do to get it from the first state into the faulty final state (reproduction). Remember the dependency chain introduced in my previous post? We actually defined the beginning of this chain, being the start or input state. And we defined the failure being the last link in the dependency chain. We should now start to find the steps linking these states which makes the output state a failure. Finding the defect in the cause-effect chain is the main part of debugging. Some research showed it can take up to 95% of the time (Myers. - The Art of Software Testing.)
To make our haystack (i.e. chain) as small as possible we should reduce it through simplification and isolation. To do this, we will use our main tool, and no it is not the debugger. It is the scientific method.
Scientific Method
The scientific method is the heart of every piece of science in the world, also the science of debugging. By following the steps consistently you have a good structured approach for locating the defect.

So what are these steps?
- Make observation(s)
- Create a hypothesis
- Predict outcomes of tests / inspections (must be falsifiable)
- test predictions (try to disprove your hypothesis)
- adjust/extend or create new hypothesis.
- repeat from step 1. Ad nauseam
When following these steps, you should do one thing at a time. If the hypothesis is refuted remember it can still be useful info, but undo any changes.
So we now have our main tool ready for action, let’s start with reducing our haystack using Simplification.
Simplification
When writing some unit tests you see that a test fails. In order to investigate the issue you run the entire test suite of your application, which takes 20 minutes. You try a fix and rerun the application, and retest again, waiting another 20 minutes. At this point you realize that only one unittest in your enormous test suite is failing so running all other tests is unnecessary. You disable the other tests and now you can test within a few seconds if your fix works.
First step in locating is to make the reproduction procedure as short as possible to reduce the search domain (haystack). We decompose our system and/or our procedure in chunks (functions, libraries, steps, etc..) in smaller haystacks and remove unnecessary steps, but keep reproducing the same (or similar) failure. For you graph-lovers out there, you will recognize it as a Breadth-first search.
After doing this we should update our notes describing our smaller haystack.
You should be able to answer the question:
- What steps are not necessary to reproduce the failure?
If we expand the diagram of our example we can see all steps the software took to come up with the bad result.
| What | Description |
|---|---|
| Problem | Given the numbers 3,5 and 1, when calling print(find_max()), then 3 is printed, but expected 5 to be printed. |
| Hypothesis-1 | print is not needed for getting 3 instead of 5 |
| Prediction-1 | When we replace print statement with assert, 3 is returned instead of 5 |
| Test-1 | Prediction-1 is confirmed |
With respect to the original call the print call is unnecessary since with a debugger we can see the value of max_num
Isolation
You arrive at your make-or-break presentation and you try to connect your laptop to the beamer. What! No image?! Your presentation is almost about to start so you ask your colleague if his laptop works. You connect the cable to his laptop, but still no cigar. You start mumbling: ‘Stupid facility management, it is 2016 and you still can’t even get a proper presentation on the screen’. Maybe changing the cable works. You run out to your desk get a new HDMI cable you have laying around, after running back you connect it to the beamer and your laptop and finally! Your presentation appears on the screen. That was close.
You survive your presentation and after the presentation your colleague asks if he can try if his laptop works, so he knows his laptop will work the next time with the new cable. Yes it does, so the problem is definitely in the old cable.
So what just happened? You’ve isolated the problem to the difference in cables. Isolation is a very powerful technique in debugging. Isolation means minimizing the difference between the actual situation and the expected/wanted situation. The critical difference causing the failure is by definition always in the red circle! You are applying the law of parsimony a.k.a. “Occam’s razor”. Meaning you are looking for the smallest difference to explain the defect.


Main isolation technique is either:
- move items from red-only to overlapping area (adding items also to good run).
- OR removing them from red-only area.
Isolation can be applied to:
- The inputs causing the failure (user input, files, settings, OS, etc…)
- The transformations involved in the failure (code changes, execution path, order)
-
The outputs showing the failure (logs, traces, files, values)
- What happens only in the bad/unwanted situation?
Lets take our example and apply isolation to the inputs of find_max.
And let us look at permutations of the inputs.
Needless to say we should use our scientific method tool and create a hypothesis and a test to try to disprove our hypothesis.
| What | Description |
|---|---|
| Problem | Given the numbers 3,5 and 1, when calling print(find_max()), then 3 is printed, but expected 5 to be printed. |
| Hypothesis-1 | print is not needed for getting 3 instead of 5 |
| Prediction-1 | When we replace print statement with assert, 3 is returned instead of 5 |
| Test-1 | Prediction-1 is confirmed |
| Hypothesis-2 | The failure only occurs when there is a specific permutation of the inputs. |
| Prediction-2 | Take all permutations of 3, 5 and 1 and feed all these values through our find_max implementation. Only certain permutations will occur in bad situations. |
Feeding these values to find_max indeed results in different outcomes.
If we take an isolation diagram an placing inputs resulting in correct outcomes
in the green circle and wrong outcomes in the red circle, we can make the
following image:

It is now clear that somehow when 5 is in the middle the find_max function fails.
This confirms our hypothesis and we have now isolated the problem to inputs where the max is in the middle position.
We’ve answered the question: What happens only in a bad/unwanted situation?
In a future post I’m writing, I want to explain more concrete isolation techniques.
Pinpointing
When you have isolated the problem to the smallest possible part of your software, it is time for pinpointing the defect. Pinpointing the defect always involves following the dependency chain.
The literature shows three main strategies to be effective:
- Binary search / wolf-fencing:
- Split the program/procedure in half, see if the system (dependency chain) is infected, if so investigate the half before that point, if not inspect the half after that point.
- (Forward) Topographic
- Given a set of inputs and transformations resulting in a failure, follow the dependency chain from the start step-by-step, until you see the defect.
- Backward reasoning
- Given a set of outputs that are faulty, walk backwards in time and follow the infections in the dependency chain up to the defect.
Choosing which strategy to use is something you will learn when doing. The rate of success of each strategy differs per situation. The most important part is that you stick with one of the three until you get stuck. After that, switch to another strategy. This way your debugging effort becomes structured.
We can take our example and apply forward reasoning to it. Again it is important to create a hypothesis, this might seem overly complex, but this will keep you focussed on what you are trying to accomplish. Next to that, this is only a trivial example, used to show the process.
Isolation showed that only in bad situations 5 is in the middle.
If we use one of the inputs in the bad situation: 3, 5, 1 we can use that to walk our dependency chain starting from the first state.
We should make a hypothesis as to how this specific permutation would result in a failure.
Maybe the find_max function can not determine what number is the maximum.
We can add Hypothesis-3 and accompany it with Prediction-3:
| Hypothesis-3 | The correct maximum number is not determined. |
| Prediction-3 | Given the inputs 3, 5, and 1, num2 (5) is not seen as maximum |
If we follow the chain step-by-step trying to disprove our hypothesis, we can see the following:
-
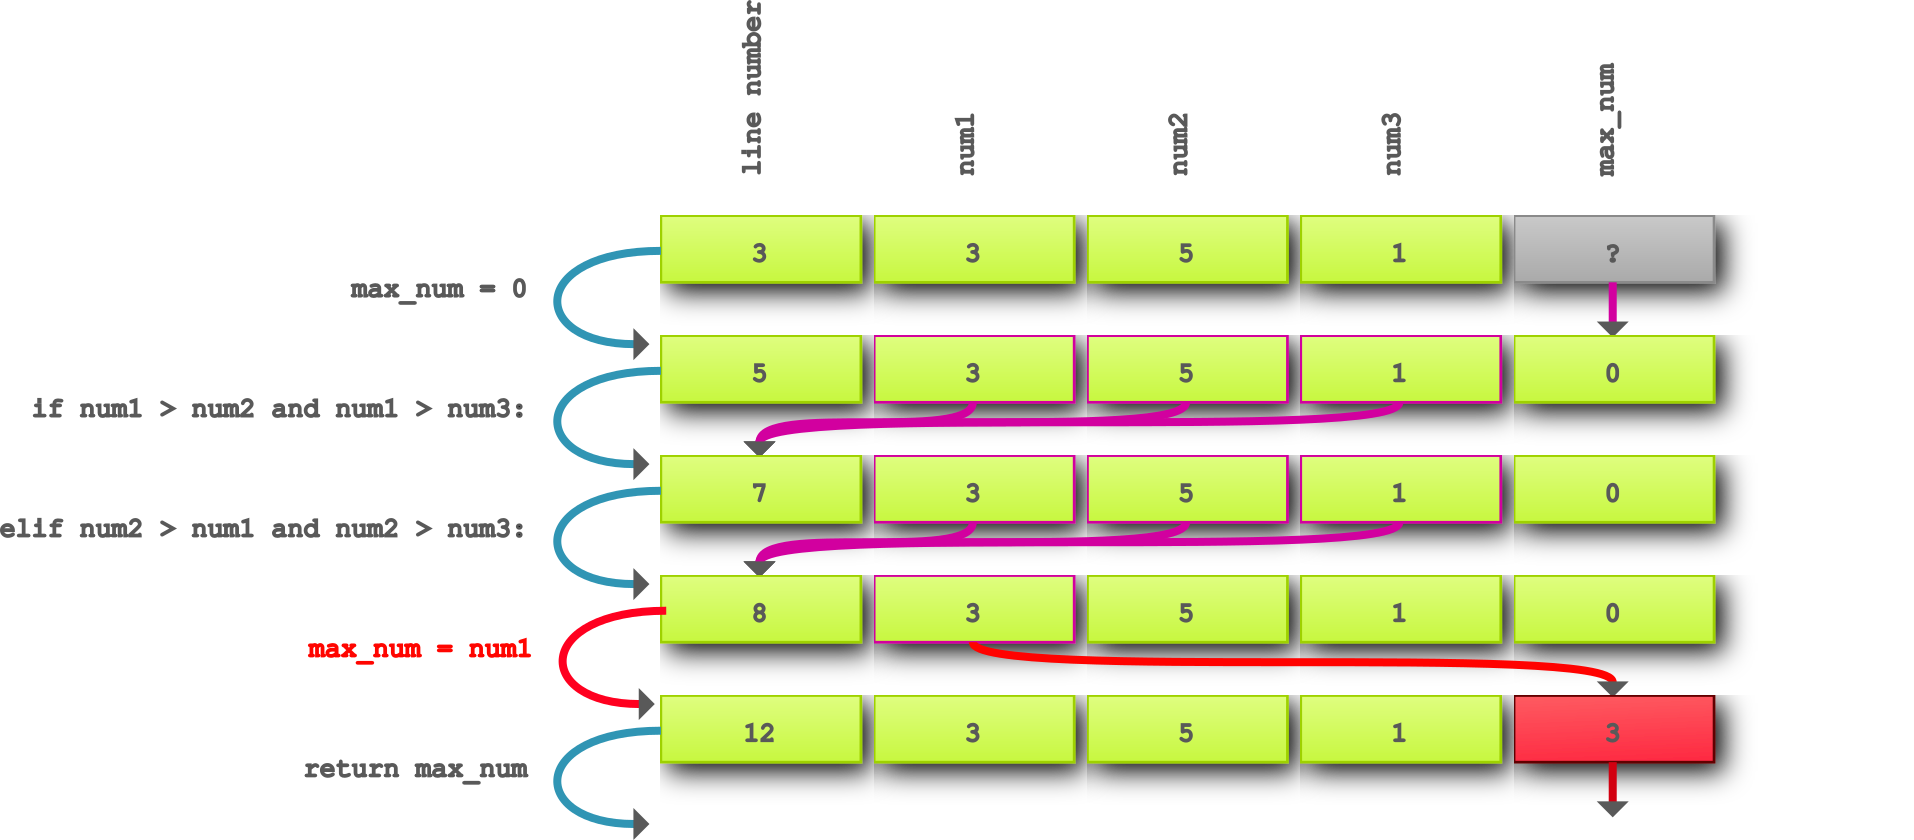
Step 1.
max_num = 0This does not determine the maximum, ignore.
-
Step 2.
if num1 > num2 and num1 > num3This checks if
num1is the maximum, it is correct since it steps over it and has as resultline_number = 7. -
Step 3.
elif num2 > num1 and num2 > num3This checks if
num2is the maximum, it is correct since it evaluates toTrueand steps into theelifbranch and has as resultline_number = 8.
The last step contradicts our hypothesis and that means our hypothesis is disproved and not valid. With this information we can create a new hypothesis and test and continue our forward reasoning:
3, 5, and 1, num2 (5) is not seen as maximum |
|
| Test-3 | Wrong, maximum is correctly determined on line 7 |
| Hypothesis-4 | The correct maximum number is determined, but not assigned. |
| Prediction-4 | Given the inputs 3, 5, and 1, num2 (5) is not assigned |
Let us continue where we left of on line 8.
- Step 4.
max_num = num1: This assignsnum1tomax_numwhich is wrong!
Eureka! We have proven our hypothesis and probably found the defect. To be sure we should continue our forward reasoning to see if this value is also returned.
| Hypothesis-5 | The incorrect number that is assigned is returned |
| Prediction-5 | Given the inputs 3, 5, and 1, the incorrect num1 is assigned and returned from find_max |
This is a very trivial example and only one step.
- Step 5.
return max_num: The infectedmax_numvalue is returned infecting the rest of the program and resulting in the failure.
In our debugging log we now have a complete story of our debugging effort, giving a complete description of the inputs, defect, infection and failure. Note that the hypothesis that was disproved is still useful since you put in effort to disprove it. If somebody in the future would take your debugging log, he can see you have tested and disproved the hypothesis saving that person effort.
| What | Description |
|---|---|
| Problem | Given the numbers 3,5 and 1, when calling print(find_max()), then 3 is printed, but expected 5 to be printed. |
| Hypothesis-1 | print is not needed for getting 3 instead of 5 |
| Prediction-1 | When we replace print statement with assert, 3 is returned instead of 5 |
| Test-1 | Prediction-1 is confirmed |
| Hypothesis-2 | The failure only occurs when there is a specific permutation of the inputs. |
| Prediction-2 | Take all permutations of 3, 5 and 1 and feed all these values through our find_max implementation. Only certain permutations will occur in bad situations. |
| Test-2 | Only permutations 1, 5, 3 and 3, 5, 1 result in a failure |
3, 5, and 1, num2 (5) is not seen as maximum |
|
| Test-3 | Wrong, maximum is correctly determined on line 7 |
| Hypothesis-4 | The correct maximum number is determined, but not assigned. |
| Prediction-4 | Given the inputs 3, 5, and 1, num2 (5) is not assigned |
| Test-4 | On line 8 num1 is assigned to max_num instead of num2 |
| Hypothesis-5 | The incorrect number that is assigned is returned |
| Prediction-5 | Given the inputs 3, 5, and 1, the incorrect num1 is assigned and returned from find_max |
| Test-5 | The invalid max_num is returned |
Fix
After you pinpointed the defect. You can climb on your chair and shout: “We found the defect!” If you have found the defect you can apply a fix. Keep being scientific and test your fix using your reproduction scenario. Usually defects cluster, so also test other values and look around.
NOTE: Extend with examples of
find_max
So, what is structured debugging?
To wrap up and give you the must-knows after reading this post:
Structured debugging is:
- Choosing a strategy and keep applying it (scientifically)
- Keep a notes during the process.
- When a strategy fails, or you’re blocked –> pick another strategy and stick to that.
Don’t get stuck by ‘THE process’, e.g.:
- If reproducing is hard, try locating it first, can give you clues/constraints about how to reproduce.
- If isolation looks promising, skip simplifying.
- Use binary-split for simplifying.